This post will guide you through the Arch Linux Installation. If you need more information on the installation, you can always visit the excellent Arch wiki.
So let’s get started.
Creating an installation Media
You can get the latest ISO file from here via direct download or BitTorrent (recommended). You can burn the ISO file on a disc or you can create a bootable USB stick.
To create a bootable USB stick, please use the instructions from here.
Also for Windows, another option is to use Win32diskimager. Just insert your USB stick, navigate to your downloaded ISO file then hit ‘write’.
Boot the installation medium
Boot to your installation media (USB, DVD, etc..) and when presented with this screen

select Boot Arch Linux (x86_64) and press Enter. You should now be presented with a shell prompt.
Establish Internet Connection
Please note that Arch Linux requires Internet connection during installation.
If you are connected via a wired connection to a router providing dynamic IP address (DHCP), then most probably you are already connected to the Internet but if you are connecting via static IP then follow this procedure.
First, identify the name of the Interface.
# ip link
1: lo: <LOOPBACK,UP,LOWER_UP> mtu 65536 qdisc noqueue state UNKNOWN mode DEFAULT group default
    link/loopback 00:00:00:00:00:00 brd 00:00:00:00:00:00
2: ens32: <BROADCAST,MULTICAST,UP,LOWER_UP> mtu 1500 qdisc pfifo_fast state UP mode DEFAULT group default qlen 1000
    link/ether 00:0c:29:65:29:39 brd ff:ff:ff:ff:ff:ff
To set the IP address:
IP Address : 192.168.1.2
Subnet Mask: 255.255.255.0
Gateway    : 192.168.1.1
DNS        : 192.168.1.1
             4.2.2.2
# ip addr add ip_address/mask_bits dev interface_name
 Example: ip addr add 192.168.1.2/24 dev ens32
To set the Gateway:
# ip route add default via ip_address
 Example: ip route add default via 192.168.1.1
To set the DNS, edit resolv.conf
# nano /etc/resolv.conf
Add the following DNS
nameserver 192.168.1.1
nameserver 4.2.2.2
Setting Up the Partitions
There are no strict rules in partitioning the hard drive. I always use GUID Partition Table (GPT) over Master Boot Record (MBR) unless I’m doing dual boot with Windows.
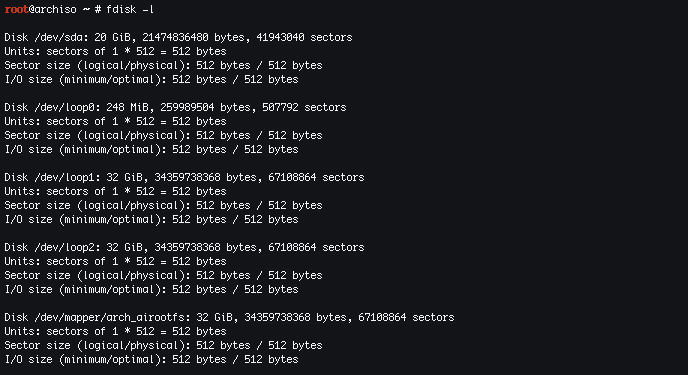
List the hard disk attached to the system
# fdisk -l
Partition the drive – /dev/sda
# fdisk /dev/sda

To create a GPT partition table, type ‘g‘
![]()
To create a new partition, type ‘n‘ then select partition number. For the first sector use the default or press enter then for the last sector you can write the partition size by appending ‘+’ before the size. Example: +4G or +20M.

To change the partition type, type ‘t‘ then select partition number and partition type. You can press ‘L‘ to list the partition types.

Here are my partitions:
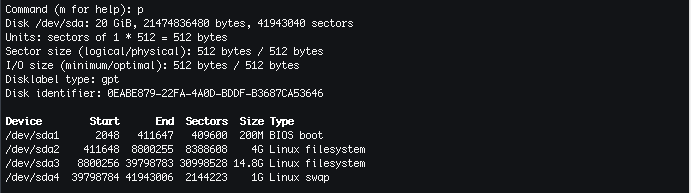
/dev/sda1 – will be the boot partition. It is a requirement for GPT
/dev/sda2 – will be my root partition. For a bigger Hard drive, I normally set this to 15G or 20G.
/dev/sda3 – will be my home partition.
/dev/sda4 – will be my swap partition. The partition size is twice the size of the installed memory on the system but if the system has more than 2GB memory then you can remove this partition.
When you are happy with your partition, type ‘w‘ to save the partition table.

Creating File Systems
We will be formatting /dev/sda2 and /dev/sda3 for our root and home directory using the ext4 file system.
# mkfs.ext4 /dev/sda2
# mkfs.ext4 /dev/sda3
Format and activate swap partition
# mkswap /dev/sda4
# swapon /dev/sda4
Mount the partitions
# mount /dev/sda2 /mnt
# mkdir /mnt/home
# mount /dev/sda3 /mnt/home
Installing the base system
# pacstrap -i /mnt base base-devel
The base-devel can be ommitted if you just want to install the basic system.
Generate fstab
Once the installation of the base and base-devel is complete, use this command to generate fstab
# genfstab -U -p /mnt >> /mnt/etc/fstab
To edit or view the generated fstab, use this command
# nano /mnt/etc/fstab
To change the timezone, language, clock settings, etc… we need to ‘chroot‘ to our newly installed base system. To do this, run the this command:
# arch-chroot /mnt /bin/bash
Setting the locale
To set the locale, edit the locale.gen file
# nano /etc/locale.gen
Look for your locale and uncomment it by removing the ‘#’ symbol.

Generate the locale from /etc/locale.gen and create locale.conf
# locale-gen
# echo LANG=en_PH.UTF-8 > /etc/locale.conf
# export LANG=en_PH.UTF-8
Setting the Timezone and Clock
Time zone and subzones can be found under /usr/share/zoneinfo/Zone/SubZone. To set your timezone run the following command with your timezone
# ln -s /usr/share/zoneinfo/Zone/SubZone /etc/localtime
  Example: # ln -s /usr/share/zoneinfo/Asia/Manila /etc/localtime
Then set the clock according to zone
# hwclock --systohc --utc
Setting the hostname
Set the hostname using this command
# echo hostname > /etc/hostname
  Example: echo myArchLinux > /etc/hostname
Setting the root password
# passwd
Creating a New User Account
# useradd -m -g users -G wheel -s /bin/bash username
# passwd username
Change username with your preferred username.
Example:
# useradd -m -g users -G wheel -s /bin/bash sonny
# passwd sonny
Allow the newly created user to do administrative tasks by editing the sudoers file:
# EDITOR=nano visudo
Scroll down and uncomment this line – %wheel ALL=(ALL) ALL by removing the ‘#’ symbol to allow the wheel group (which the new user belongs to) to use sudo to do administrative tasks.
![]()
Configuring the Package Manager
Arch linux uses a package manager program called pacman. We will uncomment the [multilib] repository which enables installation of 64-bit and 32-bit program. We will also add another repository [archlinuxfr] which enables the use of AUR.
# nano /etc/pacman.conf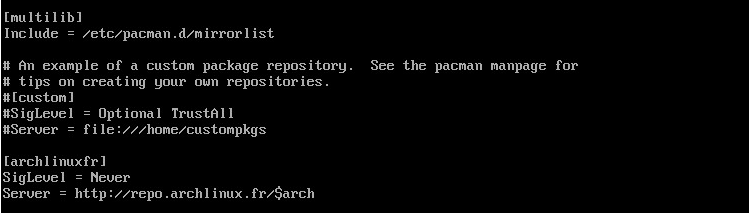
When finished, run the following command to refresh the repository
# pacman -Sy
Installing the Boot Loader
For the boot loader, I normally use GRUB .
To install the boot loader, install the grub package then run the grub-install
# pacman -S grub
# grub-install --target=i386-pc --recheck /dev/sda
# cp /usr/share/locale/en\@quot/LC_MESSAGES/grub.mo /boot/grub/locale/en.mo
# grub-mkconfig -o /boot/grub/grub.cfg
Finalizing setup
Exit from chroot, unmount the partitions then reboot
# exit
# umount /mnt/home
# umount /mnt
# reboot
Setting up your new Arch Linux Install
After reboot, you will be presented with a simple login prompt. Make it a habit to login as a normal user instead of the root user. You can use sudo to do administrative tasks. Login using the user account that you created during installation.
Configuring Network
We are going to configure the network by using netctl
# cd /etc/netctl
First, get the interface name
# ip link
1: lo: <LOOPBACK,UP,LOWER_UP> mtu 65536 qdisc noqueue state UNKNOWN mode DEFAULT group default
    link/loopback 00:00:00:00:00:00 brd 00:00:00:00:00:00
2: ens32: <BROADCAST,MULTICAST,UP,LOWER_UP> mtu 1500 qdisc pfifo_fast state UP mode DEFAULT group default qlen 1000
    link/ether 00:0c:29:65:29:39 brd ff:ff:ff:ff:ff:ff
If you are connecting to the network via DHCP, copy the ethernet-dhcp profile from the examples to the netctl directory
# sudo cp examples/ethernet-dhcp ethernet-dhcp
Edit ethernet-dhcp and replace the Interface with ens32
# sudo nano ethernet-dhcp

Enable the ethernet-dhcp profile
# sudo netctl start ethernet-dhcp
To auto-start the profile
# sudo netctl enable ethernet-dhcp
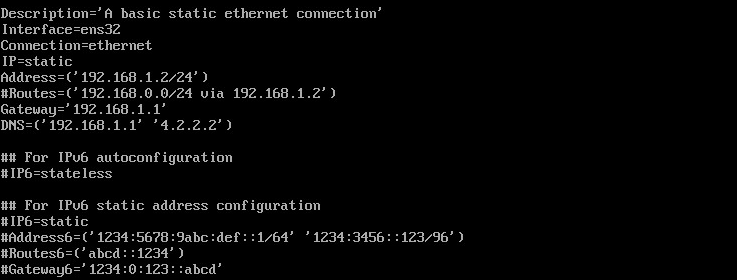
If you are connecting to the network via Static IP, then run the following command
# sudo cp examples/ethernet-static ethernet-static
Edit ethernet-static profile as and change the Interface, Address, Gateway, and DNS.
# sudo nano ethernet-static
Enable the ethernet-static profile
# sudo netctl start ethernet-static
To auto-start the profile
# sudo netctl enable ethernet-static
Installing SSH
# sudo pacman -S openssh
# sudo systemctl start sshd
# sudo systemctl enable sshd
Installing yaourt to use AUR
# sudo pacman -S yaourt
Congratulations on setting up your first Arch Linux! From here on, because Arch Linux is user centric, you can choose to make your Arch Linux install as a server, desktop (with Audio, Graphics and much more), or an HTPC.
Leave a Reply